Guide for module submission
- Preparation
- Creating a module
- Submitting a module
Preparation
NASSA membership
A submission author might want to become a NASSA member, which is free and only requires registration by contacting our core team or the community (Google Group). It will give direct access to the network with all its perks, including an easier developer workflow when contributing to NASSA’s repositories.
GitHub
GitHub hosts the library repository, which uses Git as the version control software. All submissions must be managed through GitHub and require a minimum knowledge of Git.
Submission authors who are not already GitHub users can choose any means to learn about these tools, but we recommend consulting GitHub Documentation. For a more general introduction to Git and GitHub, we also recommend SSLA’s “How to navigate the coding archaeology world: An introduction to scientific co-creation using Git and Github”.
Create a personal account in GitHub by going to https://github.com, select “Sign up”, and follow the instructions.
Once a GitHub account is set up, there are a few further preparation steps that are required, depending on the workflow chosen to create and manage modules.
Fork the library repository
Create a “fork” of the library repository (i.e. an online parallel copy associated with your GitHub account that can be easily synchronised with NASSA’s original version). Go to the library’s repository main page on GitHub (https://github.com/Archaeology-ABM/NASSA-modules) and click on “Fork” in the top right area of the page. Accept the default settings by clicking “Create fork”. You should now find yourself in a new repository, “NASSA-modules,” with your GitHub user name as the prefix (i.e., “www.github.com/user-name/NASSA-modules”).
Workflow A: using GitHub Web interface only
Virtually every task can be performed in a repository using only a GitHub account and your Web browser. Thus, if you plan to make only a few contributions to the library, we recommend this option. Check the tutorial in GitHub Docs > Get started > Quickstart > Hello World if you are new to the GitHub Web interface.
Workflow B: using local copy of repository
Having a version of the library downloaded (cloned) and synchronised on a local disc allows for editing and testing of files and code before committing any changes to the repository online. This workflow is recommended for those who plan to make many contributions (modules, updates of modules, maintenance tasks).
Taking this workflow requires the following extra steps:
- Install and set up Git. Follow the instructions given in GitHub Docs > Get started > Quickstart > Set up Git.
- Install GitHub Desktop (optional). GitHub offers a graphical interface for managing Git/GitHub as an alternative or complementary tool to the command line. Consult the instructions given in GitHub Docs > GitHub Desktop.
- Clone the library repository. If using GitHub Desktop: On your forked version of the repository, click on “<> Code” (green button). Click on “Open with GitHub Desktop”, which will open the application (browser permission required) with a pop-up window entitled “Clone a repository”. Notice that this window will already include the repository URL. Choose the directory where to clone the files (“local path”) and click on “Clone”. If using Git command lines: Follow the instructions in GitHub Docs > Repositories > Create & manage repositories > Cloning a repository.
Creating a new branch
To facilitate the management of submissions, we encourage all changes involving a new module to be carried out inside a new branch.
A branch, in Git terms, is a series of repository versions where changes are contained until finally accepted and merged back into the main series. A Git branch is unlike a literal tree branch but somewhat similar to a river branch catching different sediments and returning to the main flow, or a thread that diverges from a fabric, receives several knots, and is woven together again.
Please name the new branch using your surname to facilitate management later. You could use something like yoursurname-modules so that you can reuse it every time you submit or change a module.
Workflow A: using GitHub Web interface:
Follow the instructions in GitHub Docs > Pull requests > Collaborate with pull requests > Propose changes > Creating and deleting branches within your repository.
Workflow B: using local copy:
Follow the instructions in:
- GitHub Desktop: GitHub Docs > GitHub Desktop > Make changes in a branch > Managing Branches
- Git command lines: GitHub Docs > Quickstart > Contributing to projects > Creating a branch to work on.
Once a branch has been created, make sure that it is selected instead of “main” whenever changes are committed (see further below).
Finally, you can “publish” the branch by following the highlighted suggestion in GitHub Desktop or using command lines (Workflow B).
Creating a module
Overview
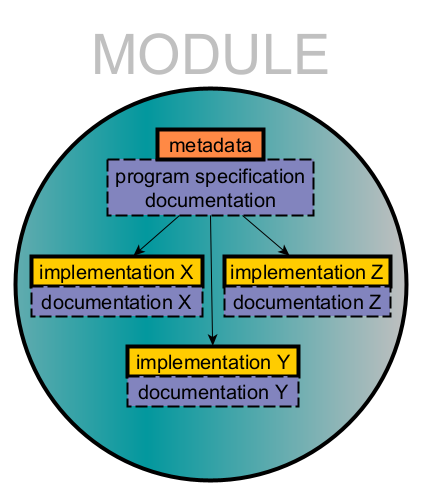
A NASSA module is a program specification of an algorithm and its implementation in one or more programming languages, accompanied by its unique metadata and documentation designed to facilitate its long-term and community-wide understanding and reuse.
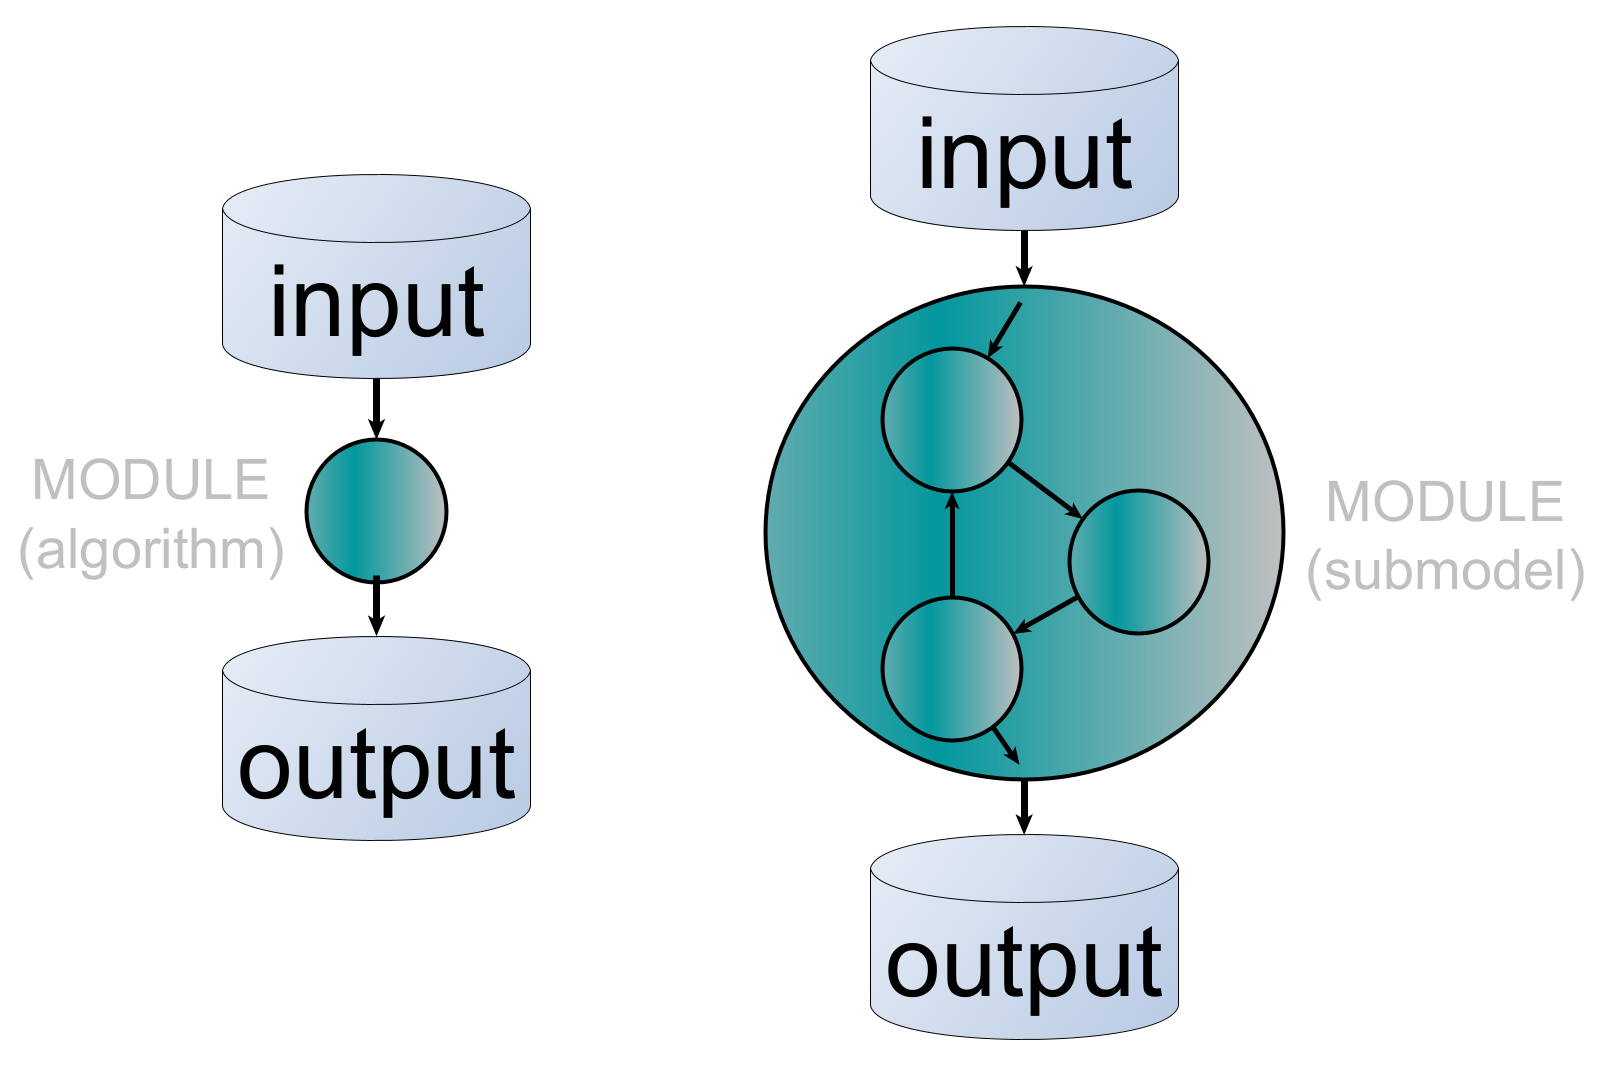
There are two types of modules: (basic, atomic) algorithms and submodels, which could be split into two or more algorithms.
Therefore, there are four essential aspects that authors must consider:
- File structure: The content of a module must be structured in a certain way in order to be recognised by users and our automated operations.
- Implementation(s): We encourage the addition of multiple implementations within a module. However, these must be separated into subdirectories according to the programming language used.
- Documentation: We allow for different layers of documentation, which are desired but not strictly required for acceptance.
- Metadata: A minimal set of files is required, which hold information on various aspects that must be tracked by NASSA members and users (e.g., authorship, minimal description, license).
After publication, NASSA modules remain open for changes by the original authors, new authors and contributors. We ask that each change follow the same guidelines for submission described here.
Templates and module examples
We strongly recommend using module templates to keep the preparation of a new module as short and straightforward as possible. The NASSA community aims to offer a variety of templates for types of modules, levels of documentation, and programming languages. Feel free to use any modules already in the library as templates if they better suit your module. Once you have created and submitted a module, you may use it as your template for creating other modules. We have also included a dummy example of a module, “1870-Schliemann-001”, which will be referenced throughout this guide. Notice that it was carefully prepared before computational archaeology was even a thing!
Visit the library Web interface, search for the term “TEMPLATE”, and select the one most suitable for your type of module. Download the template directory from its view page. The most basic and generic template is “YEAR-Surname-000”. Once the file has been downloaded, uncompress the module folder and place it into a directory of your choice.
When working locally (Workflow B), you can duplicate a module as a template, rename it, and then delete, create, or modify files accordingly.
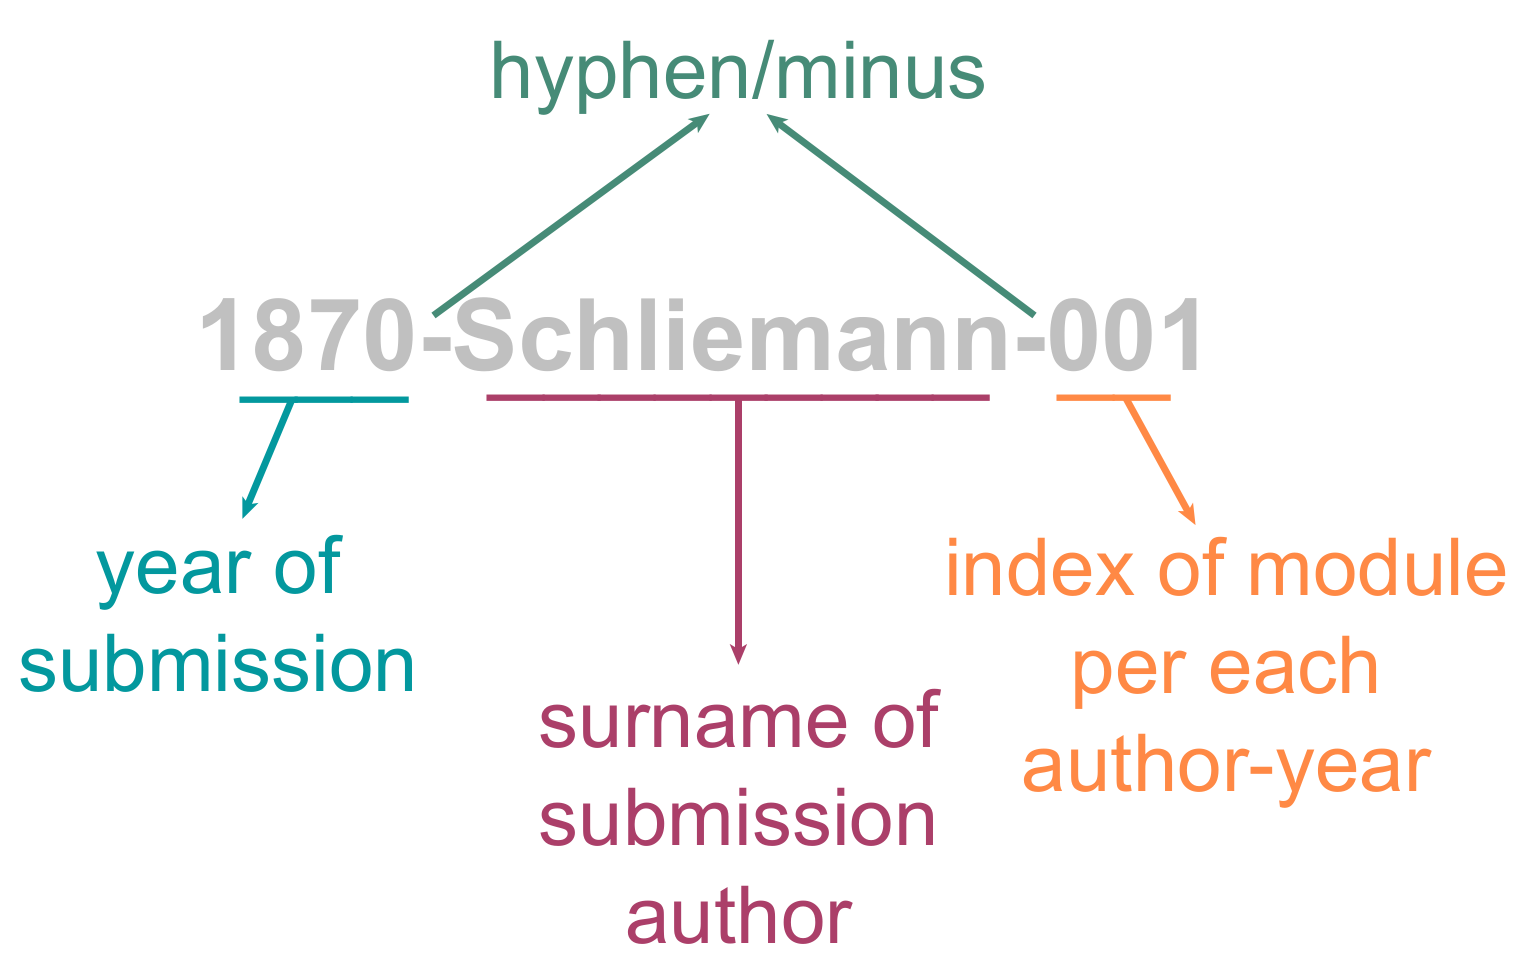
Naming the module directory
- Year of submission. The year when the module is submitted to the library repository is never to be changed, even in future versions of the module.
- Submission author surname. The surname of the submission author is a single word spelling, with no special characters. This is strictly for identification purposes, while the module authorship credits are later detailed, inside NASSA.yml.
- Index number per each author-year. A unique three-digit number based on how many modules the same author has submitted during a single year. The number is strictly for identification purposes and must be set following an ascending order (i.e., from 001 to 999).
Each element is separated by a hyphen or minus sign ("-"; Unicode specification).
Code editors or IDEs (optional)
We recommend using a code editor or an integrated development environment (IDE) to create and edit most module files.
When working locally on the library (workflow B), many code editors and IDEs can open a module directory as a “project” or “working directory”, which will help ensure no accidental changes are made outside the new module. Using such software will make editing more agile (e.g., autocomplete, syntax highlighting), help identify errors, and ease the use of command lines. Most will also offer seamless management of version control with Git.
There are many options, but a good example is Visual Studio Code by Microsoft or RStudio by Posit.
Planning a directory structure
A minimal set of files must be present and structured in a specific manner inside the directory to be considered a NASSA module. These files must be named following the NASSA schema exactly. The minimal set is:
YYYY-SURNAME-001 (module root)
│
└───<IMPLEMENTATION LANGUAGE>
    └   moduleShortTitle.<LANGUAGE EXTENSION>
  CHANGELOG.md
  LICENSE
  NASSA.yml
  README.md
  references.bib
All module templates will already contain the minimum set of files, which should then be edited according to your module’s specifications. Other modules already integrated into the library can also be observed as examples.
Of course, you should add all other files explicitly related to your module, typically placing them inside the implementation or documentation folders. As an example, the following structure is used in Schliemann’s dummy module, which is implemented in NetLogo and Python:
1870-Schliemann-001 (module root)
|
└───documentation
|   └  designDetails.md
|   └  tableOfContents.md
│
└───netlogo_implementation
|   └documentation
|   |  └   instructions.md
|   |  └   tableOfContents.md
|   |  └   TroyDestroy interface.png
|   |  └   TroyDestroy_agents interface.png
│   └   TroyDestroy.nlogo
|   └   TroyDestroy_agents.nlogo
|
└───python_implementation
    └documentation
    |  └   tableOfContents.md
    └   Army.py
    └   City.py
    └   demonstration.ipynb
    └   main.py

  .gitignore
  CHANGELOG.md
  LICENSE
  NASSA.yml
  README.md
  crossSwords.svg
  references.bib
Implementation(s)
NASSA modules are pieces of simulation models that are ultimately algorithms, i.e., finite sequences of formal instructions that receive an input and generate an output. Each implementation in a NASSA module should produce the intended sequences (i.e., represent the general program specification) while keeping all steps as explicit and intelligible as possible.
For example, in “1870-Schliemann-001”, the program specification reads:
This module takes the strength of two armies, one aggressor and another defender, and calculates the level of destruction of the defender’s city. The destructive effect on the defenders’ city is proportional to the two contending strengths and a constant rate per unit of strength of the aggressor matched by the defender.
Thus, one NetLogo implementation (“1870-Schliemann-001/netlogo_implementation/TroyDestroy.nlogo”) could be:
globals
[
  ;;; input
  greeks-strength trojans-strength
  destruction-rate
  init-troy-health

  ;;; output
  troy-health
]

to setup

  ;;; load input from interface
  set greeks-strength par_greeks-strength
  set trojans-strength par_trojans-strength
  set destruction-rate par_destruction-rate

  set init-troy-health 100

  set troy-health init-troy-health

end

to resolve-trojan-war

  ;;; Resolve the destruction level based on army strengths and a destruction rate and update city health
  set troy-health (get-effect-of-war troy-health greeks-strength trojans-strength destruction-rate)

end

to-report get-effect-of-war [ cityHealth aggressorStrength defenderStrength destructionRate ]

  ;;; Return the destruction level based on army strengths and a destruction rate
  report max (list 0 (cityHealth - destructionRate * (aggressorStrength ^ 2) / defenderStrength))

end
Schliemann was feeling generous and decided also to offer another version, properly agent-based, that fits the same specification (“1870-Schliemann-001/netlogo_implementation/TroyDestroy_agents.nlogo” ):
globals
[
  ;;; input
  greeks-strength trojans-strength
  destruction-rate
  init-troy-health

  ;;; output
  troy-health
]

breed [ cities city ]
breed [ armies army ]

cities-own [ name health ]

armies-own [ name strength ]

to setup

  clear-all

  ;;; load input from interface
  set greeks-strength par_greeks-strength
  set trojans-strength par_trojans-strength
  set destruction-rate par_destruction-rate

  set init-troy-health 100

  ;;; create agents
  create-cities 1
  [
    set name "Troy"
    set health init-troy-health
  ]

  create-armies 1
  [
    set name "Greeks"
    set strength par_greeks-strength
  ]

  create-armies 1
  [
    set name "Trojans"
    set strength par_trojans-strength
  ]

  reset-ticks

end

to resolve-trojan-war

  ;;; Resolve the destruction level based on army strengths and a destruction rate and update city health
  ask cities with [ name = "Troy" ]
  [
    let greeks-strength-total sum [strength] of armies with [ name = "Greeks"]
    let trojans-strength-total sum [strength] of armies with [ name = "Trojans"]
    set health (get-effect-of-war health greeks-strength-total trojans-strength-total destruction-rate)
  ]

end

to-report get-effect-of-war [ cityHealth aggressorStrength defenderStrength destructionRate ]

  ;;; Return the destruction level based on army strengths and a destruction rate
  report max (list 0 (cityHealth - destructionRate * (aggressorStrength ^ 2) / (defenderStrength)))

end
A few colleagues really pressed him for a Python 3 implementation, so he included the following inside “python_implementation”:
“City.py”:
class City:
    """Class representing the city under siege"""

    def __init__(self, health):
        self.health = health

    def get_effect_of_war(self, aggressor_strength, defender_strength, destruction_rate):
        """Return the destruction level based on army strengths and a destruction rate"""
        return max(0, (self.health - destruction_rate * (aggressor_strength ** 2) / (defender_strength)))

    def resolve_war(self, aggressor_strength, defender_strength, destruction_rate):
        """Resolve the destruction level based on army strengths and a destruction rate and update city health"""
        self.health = self.get_effect_of_war(aggressor_strength, defender_strength, destruction_rate)
“Army.py”:
class Army:
    """Class representing an army"""

    def __init__(self, strength):
        self.strength = strength
“main.py”:
""" Python implementation of TroyDestroy"""
from Army import Army
from City import City

# input
GREEKS_STRENGTH = 100
TROJANS_STRENGTH = 50
DESTRUCTION_RATE = 0.42

TROY_HEALTH = 100

# initialise
greeks = Army(GREEKS_STRENGTH)

trojans = Army(TROJANS_STRENGTH)

troy = City(TROY_HEALTH)

print("Troy health before war: " + str(troy.health))

# algorithm execution
troy.resolve_war(GREEKS_STRENGTH, TROJANS_STRENGTH, DESTRUCTION_RATE)

# output
print("Troy health after war: " + str(troy.health))
All implementations must fit the generic specification of the module. Each implementation language in the module should have at least one version that returns the same output for a given input. Other versions within each implementation that offer variations or extensions of the core functionality may escape this requirement according to the nature of the alternative design.
Code style
Any final code attached to the submission must be functional (run without errors, produce the expected behaviour) and readable by most of our community. The module should be understandable for a “good-enough programmer” who cannot read your mind.
NASSA recommends that authors be attentive to the following points:
Naming. Use consistent conventions to differentiate variables, parameters, and functions. Enforce exact, self-explanatory names, and avoid names imitating mathematical annotations. Exceptions could be made by compensating for name simplification with more detailed commentary and documentation.
Single-responsibility principle. The code should be modular to the best of the authors’ (programming) ability, especially if the contribution is relatively complex (e.g., if the module involves several types of entities or represents a process in several steps). See more information at Wikipedia.
No magic numbers. Magic numbers occur in code without an explicit meaning and are not adjustable without altering the code. They should preferably be replaced by named variables to be set during initialisation, even if kept as constants. (https://en.wikipedia.org/wiki/Magic_number_(programming))
Exposed inputs and outputs. All variables named as either input or output of the module must be easily reachable in code from outside the module to enable the module’s plug-and-play capability (i.e. usable without internal editing).
Minimise dependencies. Authors should avoid using third-party libraries, packages, etc., as much as possible. It is crucial to avoid any software that is relatively hard to obtain or set up. Dependencies are always a risk for reproducibility and code sustainability in the long run.
Commentary in code. Be repetitive and explain language-specific terms (not commonly known or easily searchable) whenever possible. Expand information whenever relevant, e.g., offering a source (preferably a stable URL) or explaining the logic behind a hardcoded or suggested parameter value. Add full references, with URL if available, of the sources used to inform the design of an algorithm or set parameter values. If there are any code fragments “commented out”, use a clear and consistent way to differentiate these from true commentary.
“.gitignore”
You might want Git/GitHub to ignore specific files or types of files, depending on the programming language used by the module or if demonstrations, etc, generate files. In this case, a .gitignore file should be added to your module’s main directory, specifying what should be ignored.
You can learn more about this file at Git documentation. GitHub offers an extensive list of suggestions here.
For example, “1870-Schliemann-001” includes a Python implementation that will probably be run in place by users and possibly generate cache data. For this reason, its “.gitignore” file reads:
__pycache__/
*.pyc
License
Choose an open license stating the permissions for the module’s use, reproduction, and modification. NASSA recommends either MIT or GPL-3 (see also GitHub’s choosealicense.com).
The license text must be included as a separate file named “LICENSE” (American English spelling) in the root directory. In some implementation types, when the entire code is present in a single file (e.g., NetLogo), we recommend adding a short mention of the license at the start or end of the source code file.
references.bib
A BibTex file named “references.bib” is placed in the root directory of the module and should contain all references mentioned in the metadata (“NASSA.yml”). BibTeX files can be generated using reference management software (e.g. Zotero).
CHANGELOG.md
All submitted changes in the module files must be reflected in their version number and noted in the log file (“CHANGELOG.txt”).
NASSA encourages the use of semantic versioning, whenever applicable, according to which different versions are tagged following the convention vX.Y.Z, where X, Y and Z are positive integers that increase when a new version involves major, minor and patch (correction) changes. Changes to the module metadata, such as correcting typos, wording adjustments, and author data updates, are generally considered at the lowest level.
NASSA.yml (metadata)
Metadata is contained in fields stored in the “NASSA.yml” file, placed in the module’s root directory, as exemplified in the templates.
To learn more about the YAML format, consult the language website, Wikipedia entry, or any of the many tutorials available on the Web.
If new to the YAML format, remember that the content and order of the fields are not prescribed by the format (similar to JSON). Some fields or field content will, however, be required by the validation step during module submission. About the arrangement of fields, we recommend following the order in this guide, but templates or other modules already in the library may be different from this recommendation.
If there are any doubts after following this guide, you can consult the detailed specifications of each field in the NASSA schema repository (JSON file).
The fields in “NASSA.yml” are ordered thematically below (■: mandatory field):
Module identification
- id: Module identification number. Assigned when opening a submission.
- nassaVersion: Latest version of the NASSA schema that applies to this module (NASSA.yml fields, directory and file structure).
- moduleType: Whether an algorithm or a submodel (contains modules).
- title: Module name or title. Acronyms with no verbs are recommended.
- moduleVersion: Current version identifier. Defaults to “1.0.0” and should increase after every update.
From the template “YEAR-Surname-000/NASSA.yml”:
id: YEAR-Surname-000
nassaVersion: 1.0.0
moduleType: Algorithm
title: TEMPLATE-basic (max. 50 characters)
moduleVersion: 1.1.0
For our dummy example (“1870-Schliemann-001/NASSA.yml” ):
id: 1870-Schliemann-001
nassaVersion: 1.0.0
moduleType: Algorithm
title: TroyDestroy (DUMMY EXAMPLE)
moduleVersion: 1.1.0
Authorship
- contributors: List of contributors to the module.
- roles: How this author contributed to the module (see “Authorship” below).
- name: Full name of a contributor.
- email: Stable email of a contributor.
- orcid: ORCID number of a contributor.
Authors are considered in relation to their roles (Author, Compiler, Contributor, Copyright Holder, Creator, Thesis Advisor, Translator; see definitions here). A module must have at least one person listed as an “Author”, “Copyright Holder” and “Creator”, typically the person preparing and managing the submission, whose surname is represented in the module ID. A submission author, who is not directly responsible for the implementation code, should retain the abovementioned roles and name at least one additional author with an “Author” and “Copyright Holder” role. Later code and documentation modifications can be acknowledged under the “Contributor” role. Individuals involved in formulating the algorithm but not creating the module may be acknowledged as “Author” and “Copyright Holder”.
From the template “YEAR-Surname-000/NASSA.yml”:
contributors:
 - name: Surname, Name (with no accent marks, first upper-case letters, and surname matching the id and root directory name)
   roles: ["Author", "Compiler", "Contributor", "Copyright Holder", "Creator", "Thesis Advisor", "Translator"]
   email: nassa@email.org
   orcid: 0000-0002-1825-0097
For our dummy example (“1870-Schliemann-001/NASSA.yml” ):
contributors:
 - name: Schliemann, Heinrich
   roles: ["Author", "Copyright Holder"]
   email: schliemann@email.org
 - name: Angourakis, Andreas
   roles: ["Author", "Copyright Holder", "Creator"]
   email: andros.spica@gmail.com
   orcid: 0000-0002-9946-8142
Other details
- license: Software license for the code in this module. Please use a valid SPDX identifier (second column at https://spdx.org/licenses/).
- lastUpdateDate: Date of the last update submitted.
- description: Description of what the module does. It should expand the information already given in the name/title.
- coverImage: Path to an image file with a module logo or profile image, preferably in the root of the module. Accepted formats: PNG, JPG, JPEG, SVG. The cover image is currently only used in the module profile page at Netherland’s eScience Center’s Research Software Directory.
From the template “YEAR-Surname-000/NASSA.yml”:
lastUpdateDate: 1983-04-18
description: >
  A concise but informative description of what the module does (max. 300 characters).
coverImage: Logo_noText.png
...
license: MIT
For our dummy example (“1870-Schliemann-001/NASSA.yml” ):
lastUpdateDate: 1871-10-20
description: >
  This module simulates a Bronze Age siege, calculating city destruction based on the relative strengths of attacker and defender, scaled by a constant rate per unit of matched aggressor strength.
coverImage: crossSwords.svg
...
license: MIT
Bibliographic information
- relatedModules: List of modules (IDs) this one is related to (similar, depending on, etc.). Currently, there is no automated check for the validity of the IDs in this field.
- references: Literature references. Explicit mention of BibTex IDs corresponding to the references in “references.bib”.
- moduleReferences: References that describe and explain the module, any of its parts, or its original use in a model. This includes public repositories holding models that include the module.
- useExampleReferences: References citing, describing, or using the module (only to be entered after the module has been published in the NASSA library).
From the template “YEAR-Surname-000/NASSA.yml”:
relatedModules: [ 0000-NASSA-002-TEMPLATE ]
references:
  moduleReferences: [ Epstein2008 ]
  useExampleReferences: [ romanowska_agent-based_2021, Epstein2008 ]
with the “references.bib”:
@book{romanowska_agent-based_2021,
	edition = {Electronic},
	title = {Agent-{Based} {Modeling} for {Archaeology}},
	isbn = {978-1-947864-38-2},
	url = {https://www.sfipress.org/books/agent-based-modeling-archaeology},
	abstract = {To fully understand not only the past, but also the trajectories, of human societies, we need a more dynamic view of human social systems. Agent-based modeling (ABM), which can create fine-scale models of behavior over time and space, may reveal important, general patterns of human activity. Agent-Based Modeling for Archaeology is the first ABM textbook designed for researchers studying the human past. Appropriate for scholars from archaeology, the digital humanities, and other social sciences, this book offers novices and more experienced ABM researchers a modular approach to learning ABM and using it effectively.  Readers will find the necessary background, discussion of modeling techniques and traps, references, and algorithms to use ABM in their own work. They will also find engaging examples of how other scholars have applied ABM, ranging from the study of the intercontinental migration pathways of early hominins, to the weather–crop–population cycles of the American Southwest, to the trade networks of Ancient Rome. This textbook provides the foundations needed to simulate the complexity of past human societies, offering researchers a richer understanding of the past—and likely future—of our species.},
	urldate = {2022-02-01},
	publisher = {SFI Press},
	author = {Romanowska, Iza},
	month = aug,
	year = {2021},
	doi = {10.37911/9781947864382},
},

@article{Epstein2008,
	title = {Why {Model}?},
	volume = {11},
	url = {http://jasss.soc.surrey.ac.uk/11/4/12.html},
	abstract = {This lecture treats some enduring misconceptions about modeling. One of these is that the goal is always prediction. The lecture distinguishes between explanation and prediction as modeling goals, and offers sixteen reasons other than prediction to build a model. It also challenges the common assumption that scientific theories arise from and 'summarize' data, when often, theories precede and guide data collection; without theory, in other words, it is not clear what data to collect. Among other things, it also argues that the modeling enterprise enforces habits of mind essential to freedom. It is based on the author's 2008 Bastille Day keynote address to the Second World Congress on Social Simulation, George Mason University, and earlier addresses at the Institute of Medicine, the University of Michigan, and the Santa Fe Institute.},
	number = {4},
	urldate = {2018-03-09},
	journal = {Journal of Artificial Societies and Social Simulation},
	author = {Epstein, Joshua M.},
	month = oct,
	year = {2008},
	note = {Publisher: JASSS},
	keywords = {ABM, modelling, simulation},
	pages = {12}
}
For our dummy example (“1870-Schliemann-001/NASSA.yml” ):
relatedModules: [ 1874-Schliemann-001 ]
references:
  moduleReferences: [ homer_iliad_1865 ]
  useExampleReferences: [ nassa_guide_submissions ]
And with the “references.bib”:
@book{homer_iliad_1865,
	title = {The {Iliad} of {Homer}},
	language = {en},
	publisher = {J. Murray},
	author = {Homer},
	year = {1865},
	note = {Google-Books-ID: EEYbAAAAYAAJ},
}
@misc{nassa_guide_submissions,
	title = {Guide for submissions | NASSA},
	url = {https://archaeology-abm.github.io/NASSA-hub/NASSA-hub/guide-for-submissions.html},
	abstract = {Network for Agent-based modelling of Socio-ecological Systems in Archaeology},
	language = {en-US},
	urldate = {2024-01-29},
	journal = {NASSA},
}
Implementations
- implementations: List of implementations in different programming languages.
- language: Programming language.
- softwareDependencies: Listing any software (libraries, packages, etc), specifying the release version, on which the module implementation relies to function properly.
- docsDir: Relative path to the directory containing general module documentation.
From the template “YEAR-Surname-000/NASSA.yml”:
implementations:
  - language: NetLogo
    softwareDependencies:
      - language/software version x.x.x
      - extension version
docsDir: documentation/
For our dummy example (“1870-Schliemann-001/NASSA.yml” ):
implementations:
  - language: NetLogo
    softwareDependencies:
      - NetLogo >= v6.1.1
      - gis (NetLogo extension)
  - language: Python
    softwareDependencies:
      - Python >= v.3.9
      - math (Python module)
      - random (Python module)
docsDir: documentation/
Keywords
- domainKeywords: Domain-related keywords.
- subjects: Subject keyword(s).
- regions: Region keyword(s).
- periods: Period keyword(s).
- modellingKeywords: Modelling-related keyword(s). Using NASSA schema specifications.
- programmingKeywords: Programming-related keyword(s). Using NASSA schema specifications.
Keywords are freestyle categories, open to future standardisation to avoid duplicates. NASSA recommends using terms already established in ontologies elsewhere (e.g., EHRAF for subjects, GeoNames for regions, perio.do for periods).
From the template “YEAR-Surname-000/NASSA.yml”:
domainKeywords:
  regions:
    - Global
  periods:
    - Palaeolithic
  subjects:
    - diffusion
modellingKeywords:
  - agent initialisation
  - grid initialisation
  - time initialisation
programmingKeywords:
  - Functional
  - Point-free style
For our dummy example (“1870-Schliemann-001/NASSA.yml” ):
domainKeywords:
  regions:
    - Global
    - Eastern Mediterranean
  periods:
    - Bronze Age
    - Mycenaean
  subjects:
    - war
modellingKeywords:
  - agent
  - calculation
programmingKeywords:
  - Functional
  - Object-oriented
Input and output
To facilitate later use and improve the visualisation of the module functionality, NASSA requests that all input and output variables and parameters are listed and shortly described.
- inputs: List of inputs required by the module. Create entries for each variable that can or should be given/set externally so that the module can work.
- name: Parameter/variable/file name in the module.
- type: Parameter/variable/file type. Use the programming language-specific type.
- unit: Parameter/variable unit of measurement, if applicable.
- description: Parameter/variable/file description. Meaning, data structure, or any other relevant information for procuring and preparing the input.
- outputs: List of outputs generated by the module. Create entries for each of the variables that are suggested as outputs. Ideally, the list should also include any module variable that can be read externally and is the product of module mechanisms (i.e., not equal to the inputs).
- name: Parameter/variable/file name in the module.
- type: Parameter/variable/file type. Use the programming language-specific type.
- unit: Parameter/variable unit of measurement, if applicable.
- description: Parameter/variable/file description. Meaning, data structure, or any other relevant information for procuring and preparing the input.
From the template “YEAR-Surname-000/NASSA.yml”:
inputs:
  - name: Parameter/variable/file name in the module.
    type: Parameter/variable/file type. Use the programming language specific type.
    unit: Parameter/variable unit of measurement, if applicable.
    description: Parameter/variable/file description. Meaning, data structure, or any other relevant information for the procurement and preparation of the input.
outputs:
  - name: Variable/object name in the module.
    type: Variable/object type. Use the programming language specific type.
    unit: Variable/object unit of measurement, if applicable.
    description: Variable/object description. Meaning, data structure, or any other relevant information for data analysis and interpretation or the use of the output as input in another module.
For our dummy example (“1870-Schliemann-001/NASSA.yml” ):
inputs:
  - name: greeks-strength, GREEKS_STRENGTH
    type: integer
    unit: army strength
    description: The strength of the Greek army (attackers), measured in number of soldiers, units, etc.
  - name: trojans-strength, TROJANS_STRENGTH
    type: integer
    unit: army strength
    description: The strength of the Trojan army (defenders), measured in number of soldiers, units, etc.
  - name: destruction-rate, DESTRUCTION_RATE
    type: float
    unit: city health / army strength
    description: The rate of destruction per unit of attacker strength
  - name: init-troy-health, TROY_HEALTH
    type: float
    unit: city health
    description: The general state of the defenders city, measured in population, structures, etc.
outputs:
  - name: troy-health, health, City.health
    type: float
    unit: city health
    description: The general state of the defenders city, measured in population, structures, etc.
NASSA.yml golden rules
A few general golden rules in filling up NASSA.yml are:
- Always include and fill the obligatory fields, as prescribed here. Missing one obligatory field will cause the automatic check during submission to fail.
- Fields that are not obligatory and not used by a module should be deactivated or “commented out” with
\#, as placeholders for later use, or else deleted. - Make sure that indentation of each line expresses the correct level in the hierarchy. A value or subfield written in a new line should always be one indentation right from the level of the parent field. For example:
# incorrect version description: > A concise but informative description of what the module does (max. 300 characters). # correct version description: > A concise but informative description of what the module does (max. 300 characters). - Avoid including optional fields asking for directory or file references (e.g.,
coverImage,docsDir,references) if the module does not have such directory or files.
README.md
The most generic documentation file is “README.md”, which aims to present the module with a brief overview and is assumed to be the users’ first contact with it. It is written in GitHub-flavoured markdown and may include images and external links.
The README.md file is mandatory and a minimum section structure must be kept:
# Title (matching NASSA.yml `title`)
*by Author(s)*

## Further information

(Free text no longer than 10000 characters)
In ## Further information, we recommend displaying any images included as part of the module documentation, such as diagrams, screenshots, output graphs in demonstrations, etc. Consult other modules as examples.
It is important that ## Further information exists and is no more than 10000 characters long. The text inside this section will be scraped and displayed in the module profile page at Netherland’s eScience Center’s Research Software Directory.
We recommend also including a short description and additional sections on License and References (if any):
# Title
*by Author(s)*

(short description)

## License

(name of the licence)

## References

(reference items)

## Further information

(Free text no longer than 10000 characters)
In case of “1870-Schliemann-001”, no significant image is offered to illustrate the algorithm, so the authors chose to display a Wikimedia Commons image related to the subject to make the README file more memorable:
# TroyDestroy (DUMMY EXAMPLE)

*by Heinrich "Dummy" Schliemann* (NASSA submission :rocket:)

## License

**MIT**

## References

Homer. 1865. The Iliad of Homer. J. Murray (trad.).

## Further information

This module represents a Bronze Age siege and its destructive effect on a settlement. It takes the strength of two armies, one aggressor and another defender, and calculates the level of destruction of the defenders' city. The destructive effect over the defenders' city is proportional to the two contending strengths and a constant rate per unit of strength of the aggressor matched by the defender.

<a title="Unknown Corinthian pottery maker BCE, Public domain, via Wikimedia Commons" href="https://commons.wikimedia.org/wiki/File:Corinthian_aryballos_depicting_the_trojan_war_from_1887_jahrbuchdeskaiserich_1200x500.jpg"><img width="512" alt="Corinthian aryballos depicting the trojan war from 1887 jahrbuchdeskaiserich 1200x500" src="https://upload.wikimedia.org/wikipedia/commons/thumb/3/35/Corinthian_aryballos_depicting_the_trojan_war_from_1887_jahrbuchdeskaiserich_1200x500.jpg/512px-Corinthian_aryballos_depicting_the_trojan_war_from_1887_jahrbuchdeskaiserich_1200x500.jpg"></a>

This model is an algorithm implemented in NetLogo and Python 3. Disclaimer: the code might require updates since it was written in the 19th century.

Overview of the algorithm:

$$warEffect=-destructionRate*\frac{(attackerStrength)^2}{defenderStrength} $$

See full list of documentation resources in [`documentation`](documentation/tableOfContents.md).

### Acknowledgements

The "crossed swords" emoticon (⚔️) used as cover image was sourced at [Twitter Emoji (Twemoji) v14.0](https://github.com/twitter/twemoji) under CC BY 4.0.
Other documentation files
Although not a strict requirement for acceptance, a module should aspire to include a minimal set of files dedicated to documentation. Modules offering more documentation materials will be significantly more visible and usable by the community.
Because modules are both program specifications and implementations, we recommend that documentation be prepared at two levels:
-
A generic understanding of what the program does and its entities, variables, parameters, etc., as well as any reference or scientific argument to contextualise its design. General documentation typically involves infographics, diagrams, equations, or text descriptions. We recommend storing the files holding this type of documentation inside a subdirectory directly in the module’s root directory (e.g.,
1870-Schliemann-001/documentation/). However, these materials can also be displayed in## Further informationin the README file. -
A description of the terms and design of a single implementation, including practical instructions and specific terminology. This should also include instructions on compiling and running the respective code, if necessary. We recommend storing these files inside the subdirectory with the corresponding implementation (e.g.,
1870-Schliemann-001/python_implementation/documentation/). Some examples of language-specific documentation materials are:- Set up instructions. Instructions on compiling and running the code. This is more relevant when using general-purpose programming languages or relying on specific libraries or external software.
- User reference manual. Variable and methods/functions lists, entity definitions, etc.
- Screenshots of the graphical interface or output.
- Pseudocode. Representation of code as a sequence of logic steps (i.e., algorithm), using free-text or mathematical notation, or using graphical resources, be it formal (e.g., UML) or informal (e.g., infographics).
- ODD or similar, when submitting modules of the type “submodel”. To learn more about ODD, see Grimm et al. (2013).
- Demonstrations. A step-by-step demonstration of the module use and outputs, combining explanations in text and code fragments, typically in an interactive notebook format (e.g., .ipynb, .rmd).
Grimm, V., Polhill, G., & Touza, J. (2013). Documenting Social Simulation Models: The ODD Protocol as a Standard. In B. Edmonds & R. Meyer (Eds.), Simulating Social Complexity: A Handbook (pp. 117–133). Springer. https://doi.org/10.1007/978-3-540-93813-2_7
To boost the visibility of documentation files, we recommend that authors create a markdown file at both the general and implementation levels to present a list of the documentation files (e.g., tableOfContents.md), with brief descriptions and links (relative paths) to the respective files. Such a file can then be linked from README.md.
See examples of how to do it in the templates offered in the library.
In “1870-Schliemann-001”, notice how an instruction was included for the NetLogo implementation, a demonstration (.ipynb) for the Python implementation, and a design details file to explain the algorithm in more general terms:
1870-Schliemann-001 (module root)
|
└───documentation
|   └  designDetails.md
|   └  tableOfContents.md
│
└───netlogo_implementation
|   └documentation
|   |  └   instructions.md
|   |  └   tableOfContents.md
|   |  └   TroyDestroy interface.png
|   |  └   TroyDestroy_agents interface.png
│   └   TroyDestroy.nlogo
|   └   TroyDestroy_agents.nlogo
|
└───python_implementation
    └documentation
    |  └   tableOfContents.md
    └   Army.py
    └   City.py
    └   demonstration.ipynb
    └   main.py

  .gitignore
  CHANGELOG.md
  LICENSE
  NASSA.yml
  README.md
  crossSwords.svg
  references.bib
In this case, “README.md” links to “documentation/tableOfContents.md”, which reads:
TroyDestroy (DUMMY EXAMPLE)
# General documentation
## Table of contents

- [`designDetails.md`](designDetails.md) : free format document describing the module process, beyond the level of implementation.

- [NetLogo implementation](netlogo_implementation/documentation/tableOfContents.md) : documentation specific to the NetLogo implementation.

- [Python implementation](python_implementation/documentation/tableOfContents.md) : documentation specific to the Python implementation.
Leading to “netlogo_implementation/documentation/tableOfContents.md”:
TroyDestroy (DUMMY EXAMPLE)
# Documentation - NetLogo implementation
## Table of contents
- [`instructions.md`](instructions.md)
- [`TroyDestroy interface.png`](TroyDestroy%20interface.png)

- [`TroyDestroy_agents interface.png`](TroyDestroy_agents%20interface.png)

and to “python_implementation/documentation/tableOfContents.md”:
TroyDestroy (DUMMY EXAMPLE)
# Documentation - Python implementation
## Table of contents

- [`demonstration.ipynb`](demonstration)
The golden rules in preparing documentation files are “nothing is trivial enough to be mentioned” and “do not fear repeating yourself”. The point is to facilitate the understanding of the module at different levels and for different backgrounds.
Validation (workflow B)
If you are operating over a local copy of the library, you have the option of checking the integrity of your module, that is, if it has all the files and metadata necessary for being processed in submission. This check will occur in GitHub after you create the Pull Request with your module (i.e. module submission), but performing the test locally before submission might save you time later.
To perform the check, go to nassa-hs repository and follow the instructions in “README.md”.
Submitting a module
Commit the new module directory to branch
In GitHub, navigate to the new branch of your copy of the NASSA library. This should be something like: “https://github.com/your-user-name/NASSA-modules/tree/name-of-your-branch”. Click on “+” and select “Upload files”. Upload the module folder, naming the commit as “module submission”, and commit the changes.
When working locally (workflow B), open the library directory of your new branch and copy the module folder to the library’s root directory. Then create a commit named “module submission: moduleID” (e.g. “module submission: 1870-Schliemann-001”).
Remember to publish the branch if you haven’t done so already (GitHub Desktop will remind you).
Create Pull Request
Once all module files have been committed to your branch, you can create a Pull Request. To facilitate the review and checking of modules, do NOT commit more than one module per Pull Request. If you want to work on two or more submissions at a time, do it by containing each in a separate branch of your fork.
In the GitHub Web interface, any number of commits to your branch/fork will trigger a reminder with a green button “Compare & pull request”. Alternatively, navigate to the Pull requests tab on the top menu area and then “New pull request”.
When working locally (Workflow B), GitHub Desktop will also remember you with a suggestion in the main area of the interface.
The next screen will allow you to name the Pull Request and write a description. If a single commit is made, the title of the Pull Request will be “module submission” with any description text you have added. If not, make sure the title is “module submission: moduleID” (e.g. “module submission: 1870-Schliemann-001”).

Further down this page, it will list all new changes of your branch/fork compared to the main branch of the original NASSA library repository (“Archaeology-ABM/NASSA-modules”).
On the right sidebar, you may also request reviewers among colleagues, including anyone in the NASSA community or GitHub users you know. By default, the Pull Request will be reviewed by at least one core team.
You can submit the Pull Request with the green button on the right, “Create Pull Request”, or save it as a draft (down arrow symbol in the same button).
Automatic check
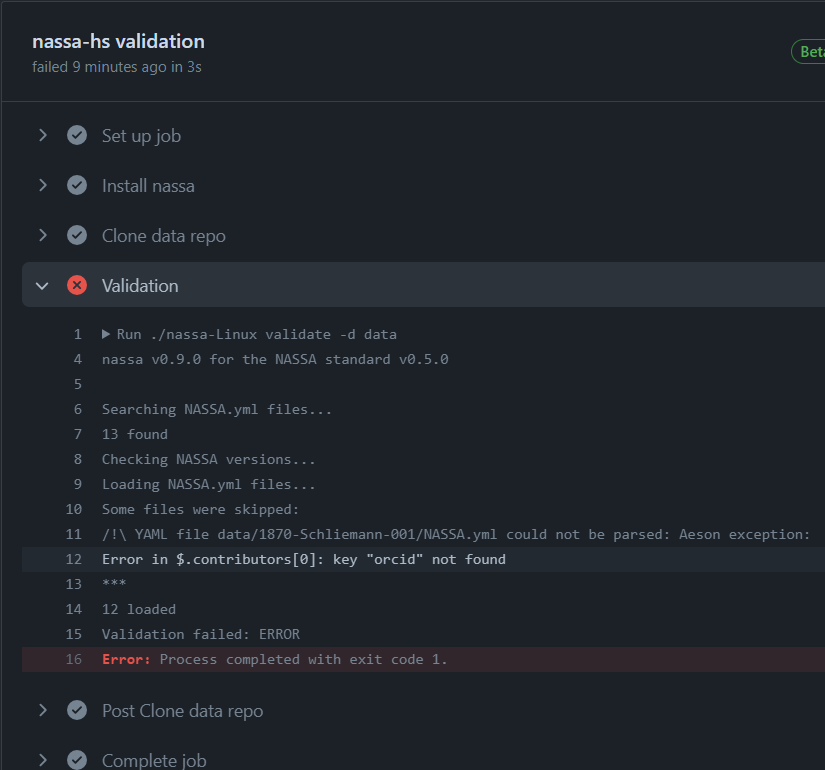
The NASSA library repository will execute the nassa-hs application for every new Pull Request to test if it complies with all minimum requirements (module “validation”). This will take a few seconds.
If you followed all required specifications in the NASSA schema, particularly regarding the content of “NASSA.yml”, your Pull Request should pass.
In our case here, we notice that Schliemann, not known for his digital proficiency, has committed a few last-minute changes. Ah, I am sure we should not worry…
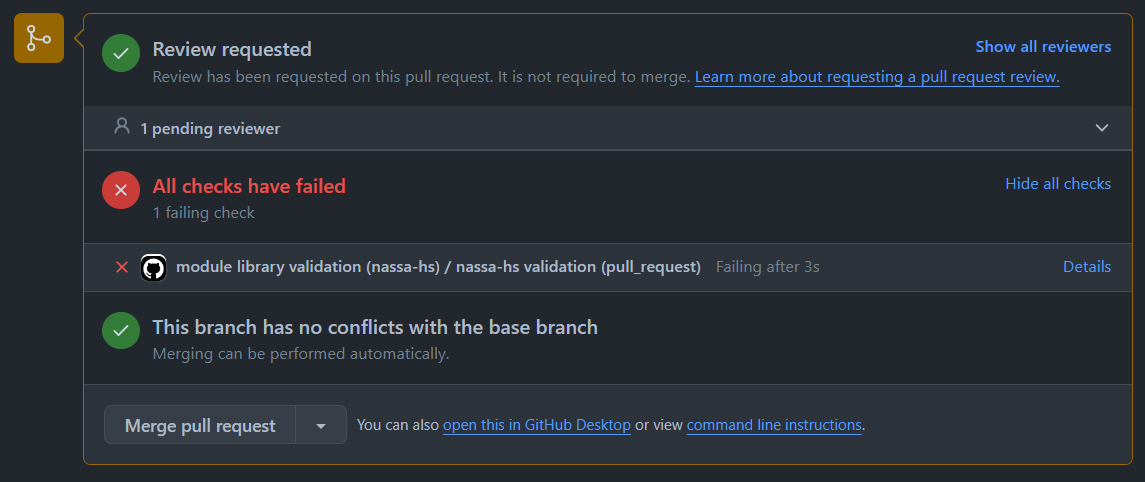
Do not panic if the check fails! In most cases, the problem has an easy solution. When having a failed test, click on the “…” button on the right and select “View details” (you may also try the “Explain error” option with Copilot). The next screen will show you, in “Validation”, the console printout of the nassa-hs execution and indicate what was found missing.

In this case, something went wrong with the YAML format of “NASSA.yml”. The error message might seem sometimes rather cryptic: here, we missed something related to the - (the bullet point operator to define lists in YAML). However, we do have a clue in the line and column numbers (line 24, column 2).
To solve the problem following Workflow A, return to your Pull Request page and select the “Files changed” tab. Click the three dots in the top right corner of the editor and select “Edit this file”.
If we open a local copy of the module in an IDE (Workflow B), we can check line 24:

We now see that we are missing a important detail: the regions subcategory within the domainKeywords section. Note how an IDE such as Visual Studio Code helps us quickly identify this kind of issues in YAML files (see red flags). Correcting such mistakes will also clearly show in IDEs:

Make the changes and commit. For Workflow A, click on “Refresh”, highlighted at the top, to see the changes integrated in the Pull Request. When using Workflow B, push the changes to your fork/branch.
After committing the changes to our branch, we can now return to the “Conversation” tab in the Pull Request page. The new commit will automatically trigger a new check. Another error is found:
Having a new error is good news because it means that the previous one was fixed. Now, the problem is strictly related to NASSA schema specifications: the text in description is too long. Strange, because our text was not that long. It seems that Schliemann replaced our concise description with a long excerpt of his long lost diary.
description: >
  As I, Heinrich Schliemann, stood before the windswept ruins of Troy, I conceived of a method by which to render the great sieges of the Bronze Age not only in story, but in number. In my imagination, the clash of armies could be distilled into a model: the attackers bring forth their strength, the defenders theirs, and the destruction of the city is measured not in vague tales but in proportion to these opposing forces. I introduced a constant rate of devastation for every unit of aggressor strength that meets its match upon the walls, so that the outcome of a siege might be calculated, not merely told. In this way, the legendary sack of Troy, and indeed the fate of any ancient citadel, could be reenacted as a balance of strength, a numerical echo of what once transpired in blood and flame.
We can remedy this by recovering the previous text and moving his text to “Further Information” in README.md. Committing our changes, we see that the check moves forward but finds yet another problem:

This time, the problem is a simple typo in the implementations field: NetLogo was misspelled as “NetLog”. This was probably a keyboard accident by Schliemann, who is not used to modern technology.
After correcting the typo and committing the change, we see that the check moves forward again but stumbles upon a forth and hopefully last problem:

Again a typo, but in this case the error is giving as a confusion related to the relative path given for the documentation directory. Schliemann had an bilingual lapsus and “corrected” it using the German spelling, including using an upper case “D”. Notice that this is flagged because the actual directory is spelled in English and in lower case.
Fixing this, we see that the check finally passes:
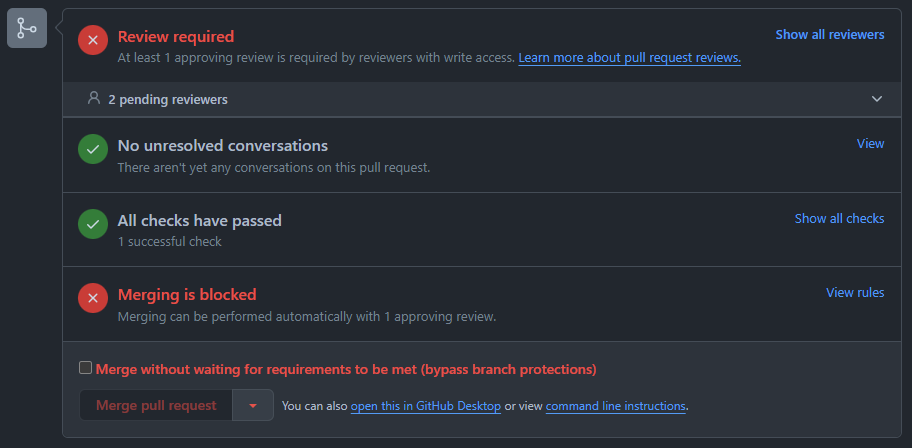
The automatic check only verifies the integrity of the module files and metadata. It does not check if the module code works or if the documentation is sufficient. This will be part of the review process by NASSA members. Only the library maintainers can merge the Pull Request after at least one reviewer approves it (you should not have the check box shown in the screenshot).
If you have any doubts in this stage or the problem is not clear from the printout of nassa-hs, write to one of our core team or to the community (Google Group) by email or through GitHub.
Module review
One or more NASSA members will then review your module submission (Pull Request) and possibly suggest changes by commenting on or modifying the files as they appear in the Pull Request.
NOTE: The pull request will be notified to the library maintainers, but you may use the cog icon in the “Reviewers” section, on the right side, to request a particular NASSA member and GitHub user to review it.
Until at least one reviewer approves, the submission pull request will not be able to merge into the library repository (i.e. become part of it).
Both you and the reviewers can add comments to your Pull Request regarding each file that has been changed/added. You should add a comment in advance to explain a possible issue, anticipating a reviewer who might raise the point. To do this, go to the “Files changed” tab in your Pull Request, search for the file in the list, and click on “Comment on this file” (the speech bubble on the right side).
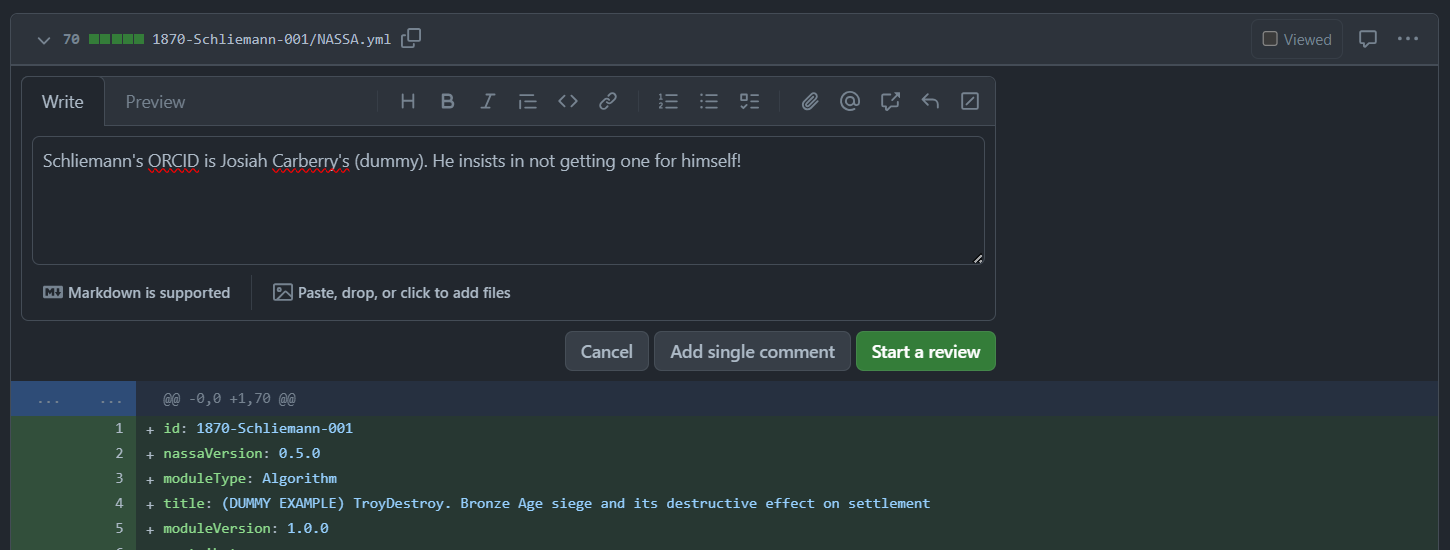
With this, you may also start a review on your own submission, which is profound yet completely unnecessary.
Reviewers will use this tool to add comments and make suggestions during the review process. We expect everyone in the community to be fair and polite, if not friendly, when reviewing modules. Modules do not need to be perfect, and we expect many submissions to be revised or expanded later by the original authors or other new contributors. If you are in a dispute with a reviewer or think that a reviewer has been unfair, don’t hesitate to contact our core team.
NASSA maintainers will reserve the right to edit files in the Pull Request to fix minor issues or typos, improve metadata format and detail, and even refactor code. No change to the core functionality of the module will be made by reviewers or maintainers without the explicit consent of the original authors; if so, the person involved should be included as contributor with role “Contributor”.
As the submission author (who created the Pull Request), you should read and reply when necessary while also deciding if there are any suggested changes. For more information, see the GitHub documentation.
Notice that every change made during the review process triggers the automatic check or validation. You need to address any new errors before merging.
If there are many challenging or structural problems, like having typos in folders or file names, you can cancel the Pull Request and prepare a new, revised one. To do this, click on “Close Pull Request” at the bottom of your Pull Request page. After the Pull Request is closed, you may make more drastic changes and repeat the steps for creating a new submission (Pull Request).
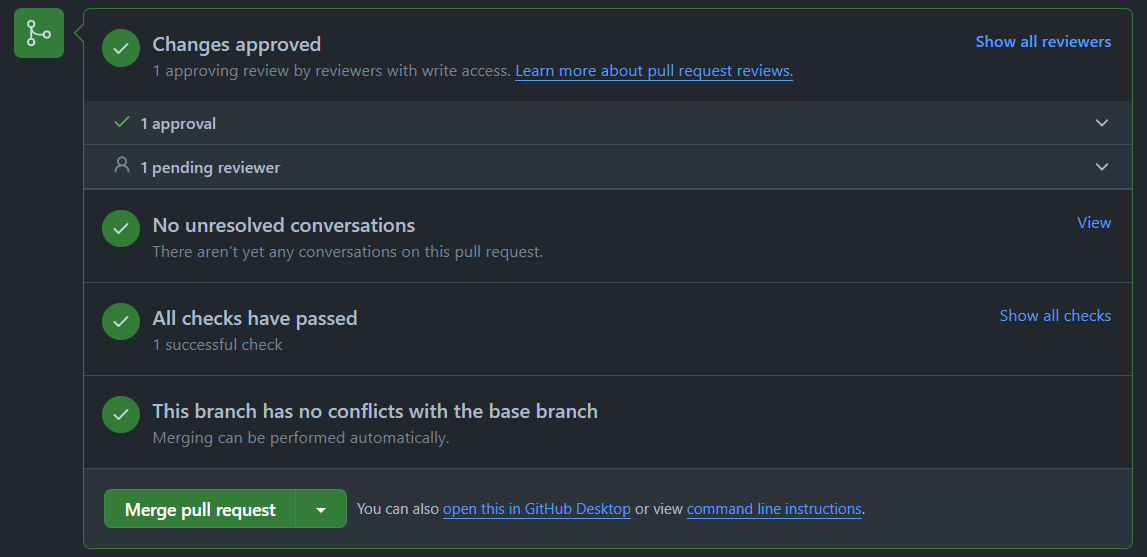
A satisfied reviewer will leave an approval that will be part of your Pull Request history.
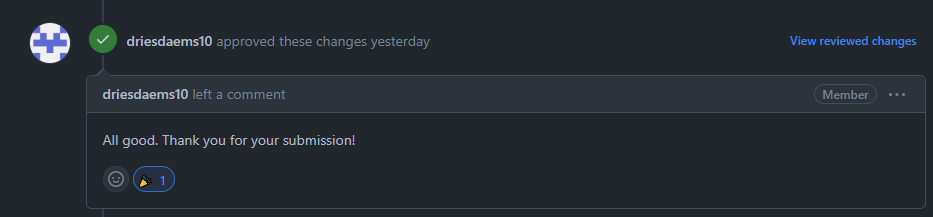
Once one reviewer is satisfied, the Pull Request will be unblocked and available for merging into the library’s main branch.
You’ll be able to wait further for other pending reviewers or merge it by clicking on the green button at the bottom of the Conversation tab. If left unattended for too long, a Pull Request with a full green light will eventually be merged by a maintainer.
Module publication
After merging the Pull Request, your module will become part of the NASSA library. It will be directly findable by its ID at the library repository.
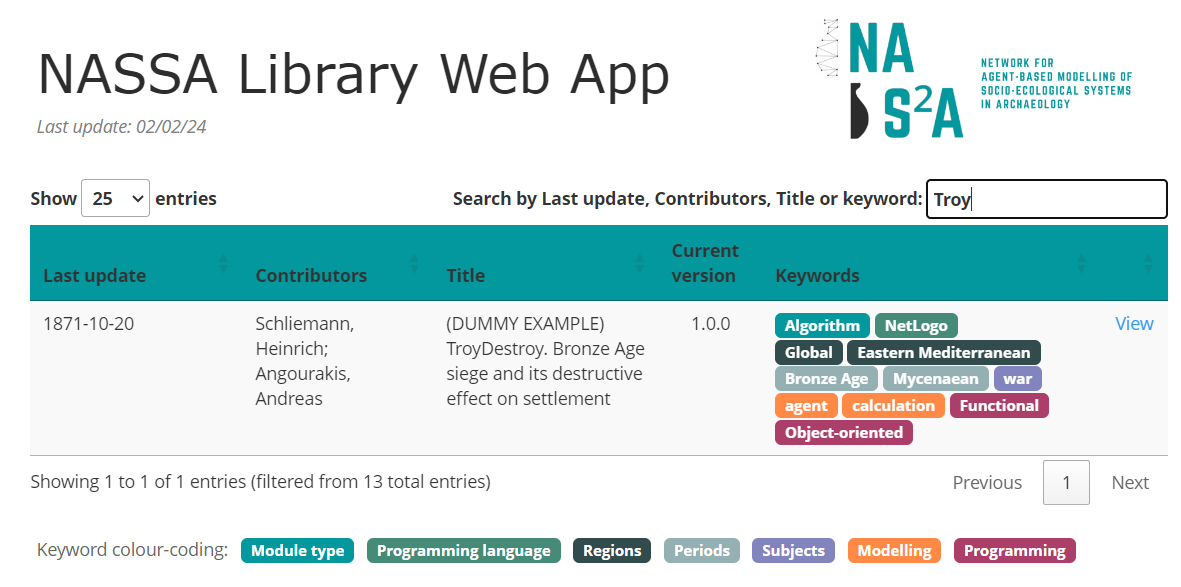
After processing through GitHub Actions, your module will appear at the NASSA Library Web App linked to a dedicated webpage (“view”) displaying most of its metadata and README. See the one generated for 1870-Schliemann-001.
At this point, you might rethink some details of the metadata and documentation, once you preview them on the website. Unlike papers and other publications, NASSA modules remain open indefinitely for new changes by the original authors and others in the community. We ask that each change be submitted through the same process explained here, no matter what, from the correction of a typo to major changes in the code. However, take care of raising the module version and noting new contributors accordingly.
It is time to promote your module and cite it!